Wissensdatenbank/FAQ

Lorem ipsum dolor sit amet, consetetur sadipscing elitr, sed diam nonumy eirmod tempor invidunt ut labore et.Lorem ipsum dolor sit amet, consetetur!

Categories

FAQ MIPI

MIPI General topics

The reference point is the center of the board which is also the optical center of the sensor.

The tolerance of the drilling hole diameter is +0.10mm/-0.05mm.

The tolerance of the drilling holes position is +/- 0.05mm

There is no precise information possible about the tolerance of the placement of the components on the board as there are too many factors impacting this. To be on the safe side we usually assume +/- 0.1mm as worst case.

We are using the following connector from JST: 22FLZT-SM1-TF(LF)(SN).
The connector has 22 pins and a pitch of 0.5 mm.


The datasheet can be found here:

https://jst.de/file/download/236/pitch-0-5-mm-zif-flzt-pdf

MIPI with NVIDIA

libargus does not work out of the box with non-color sensors. It is necessary to change the grey value image format to a color format. See here function adjust_pixel_format():


https://github.com/VC-MIPI-modules/vc_mipi_nvidia/blob/master/target/demo.sh


Additionnally it is necessary to set the saturation to zero ( nvarguscamerasrc saturation=0 ), to avoid getting an image with wrong colors.

First execute this script (on the Host PC in your_work_folder/vc_mipi_nvidia/bin):

./setup.sh –target 

Enter the user name and the IP address of the Jetson device when asked. This is necessary for the next steps. The script may require the user password several times. The script installs a demo script, the vcmipidemo and the kernel install script in the folder /test on the Jetson device.

After doing code changes, rebuild the kernel:
./build.sh -k    

Upload the newly built kernel on the Jetson device:

./flash.sh -k

Then switch to the Jetson command line and install the new kernel:

test/install.sh -k

The Jetson device restarts automatically.

It is possible to tweak the camera image using the ISP. The ISP tunings can be done in the camera_override.isp file. VC provides example files for the IMX296C, IMX412C, IMX415C and IMX568C (sample files attached). Please note that these files are only examples, the ISP tuning is dependent on the customer’s setup (used lens etc.).


$ sudo cp camera_overrides.isp /var/nvidia/nvcam/settings/
$ sudo chmod 664 /var/nvidia/nvcam/settings/camera_overrides.isp
$ sudo chown root:root /var/nvidia/nvcam/settings/camera_overrides.isp

Attachment: https://files.vision-components.com/mipi/VC-ISP-Tunings.zip

MIPI with Raspberry PI

Edit the file config.txt:
sudo nano /boot/config.txt
Set the VC4 driver to “off”:

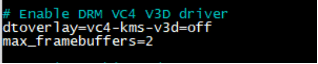
Reboot the Raspberry Pi. It should work now.

A ROI (region of interest) can be set using the following v4l2 control:
v4l2-ctl -d /dev/video0 --set-selection target=crop,width=640,height=480,top=0,left=0 -p 100000 

The additional parameter „-p 100000“ sets an excessively high framerate, to get the highest possible framerate (on sensors which offer a higher framerate when using cropping). To test the obtained max. framerate execute the following command:

v4l2-ctl -d /dev/video0 --stream-mmap --verbose -c exposure=1
The following command sets the framerate (parameter „-p“) and starts a stream:
v4l2-ctl -d /dev/video0 --stream-mmap -p 25   

Anmeldung

Hands-on Workshop: FPGA Programming for Embedded Vision

23.04.2024

9:30 – 17:00 Uhr

Ettlingen bei Karlsruhe

149 € pro Teilnahme

Keine VC News mehr verpassen

Melden Sie sich für unseren Newsletter an und erfahren Sie alle Neuigkeiten als Erster!