VCSBC DragonCam® Series Operating Manual
Hardware specifications of VCSBC DragonCam® Smart Cameras
| Revision: | 1.0.4 |
|---|---|
| Date: | 2021-12-17 |
| Contact: | support@vision-comp.com |
| Copyright: | 1996-2020 Vision Components GmbH Ettlingen, Germany |
| Author: | VC Support, mailto:support@vision-comp.com |
This documentation has been prepared with most possible care. However Vision Components GmbH does not take any liability for possible errors. In the interest of progress, Vision Components GmbH reserves the right to perform technical changes without further notice.
Please notify support@vision-components.com if you become aware of any errors in this manual or if a certain topic requires more detailed documentation.
This manual is intended for information of Vision Component’s customers only. Any publication of this document or parts thereof requires written permission by Vision Components GmbH.
| Symbol | Meaning |
|---|---|
 |
The Light bulb highlights hints and ideas that may be helpful for a development. |
 |
This warning sign alerts of possible pitfalls to avoid. Please pay careful attention to sections marked with this sign. |
 |
This is a sign for an example. |
Trademarks
Linux, Debian, the Tux logo, Vivado, Xilinx and Zynq, ARM, Cortex, Windows XP, Total Commander, Tera Term, Motorola, HALCON, FreeRTOS, Vision Components are registered Trademarks. All trademarks are the property of their respective owners.
ESD sensitivity
Warning
The components are very sensitive to electrostatic
discharge (ESD)! Please take all the precautions necessary to avoid ESD!
ESD
 The electronic components and circuits are sensitive to ElectroStatic
Discharge (ESD). When handling any circuit board assemblies, it is
necessary that ESD safety precautions be observed.
The electronic components and circuits are sensitive to ElectroStatic
Discharge (ESD). When handling any circuit board assemblies, it is
necessary that ESD safety precautions be observed.
ESD safe best practices include, but are not limited to:
- Leaving circuit boards in their antistatic packaging until they are ready to be installed.
- Using a grounded wrist strap when handling circuit boards.
- Working on a grounded ESD table mat.
- Only handling circuit boards in ESD safe areas, which may include ESD floor and table mats, wrist strap stations and ESD safe lab coats.
- Avoiding handling circuit boards in carpeted areas.
- Try to handle the board by the edges, avoiding contact with components.
This note is not an exhaustive information about the protection against electrostatic discharge (ESD).
Table of Contents
1 General Information
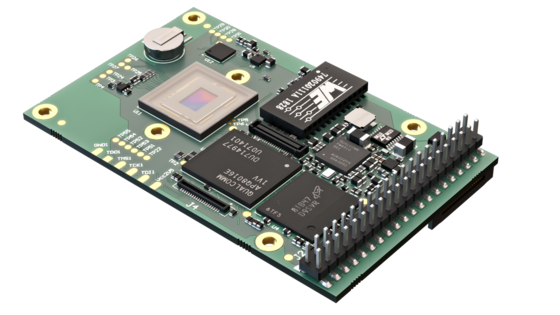
The VCSBC DragonCam Series Smart Cameras have been designed for high resolution image processing with a very small form factor. They are the ideal compromise between high performance and low system costs, and thus especially suited for high volume OEM applications. This makes them viable to use a smart camera in even more products than before.
Based on a quad-core processor ARM® Cortex®-A53 with 1.2 GHz the models of the new VCSBC DragonCam series offer solutions at extreme high-speed in real-time.
The operating system VC Linux provides for the ideal interaction of hard- and software.
All cameras are equipped with a battery backed real time clock and come with 12 programmable input/output signals, with trigger input and flash trigger output, as well as a Gigabit Ethernet interface. Different CMOS sensors with global shutter are available (the image resolution can be changed to the ROI required).
Some VCSBC DragonCam Smart Cameras will also be available with remote head (VCSBC DragonCam RH Series).
The extremely low power consumption of only 4.2 W (max.) makes this camera ideally suitable for use in mobile devices.
1.1 Technical Specifications VCSBC DragonCam
| Component / Feature | Specification |
|---|---|
| CMOS Sensor |
|
| Active pixels |
|
| Pixel size |
|
| Active sensor size |
|
| High-speed shutter |
|
| Low-speed shutter |
|
| Integration | Global shutter |
| Picture taking | program-controlled or external high speed trigger, jitterfree acquisition
|
| A/D conversion | 8 Bit |
| Input LUT | no |
| Image Display | Via 1 Gbit Ethernet onto PC |
| Processor | Quad-Core ARM® Cortex®-A53 with 1.2 GHz |
| RAM | 1 GB DDR-SDRAM |
| Flash EPROM | 16 GB flash memory (nonvolatile) industrial eMMC |
| Process interface | 12 programmable I/Os via Lattice FPGA |
| Additional LVTTL IOs | I2C Clock and Data signals, trigger input (opto-decoupled), Flash output (open collector) |
| Ethernet interface | 1 Gbit over USB 2.0 |
| Serial interface | RS232 |
| Storage Conditions | Temperature: -20 to +60 deg C, Max. humidity: 90%, non condensing. |
| Operating Conditions | Temperature: 0 to +50 deg C, Max. humidity: 80%, non condensing. |
| Power Supply | 12 – 24 V DC, max. 600 mA |
| Power Consumption | Approx. 4.2 W |
1.2 Cooling
Cooling using a heat spreader is required. Thermal conductive pads are available as acessoires.
2 Camera Interfaces
2.1 Interface Listings
The pin assignments, electrical specifications as well as available accessories are shown for each interface connector in the following sections.
2.1.1 VCSBC DragonCam
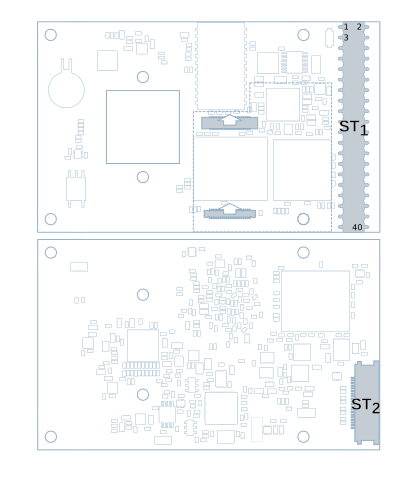
VCSBC DragonCam Interfaces
The VCSBC DragonCam Series camera boards incorporate the following connector interfaces:
- ST 1
- Power, IO, Ethernet, trigger, serial interface connector
- ST 2
- Alternative Ethernet Socket
2.2 ST 1: Power Supply, IO Interface, Ethernet, trigger, serial interface
2.2.1 Pin Assignments ST 1 camera socket
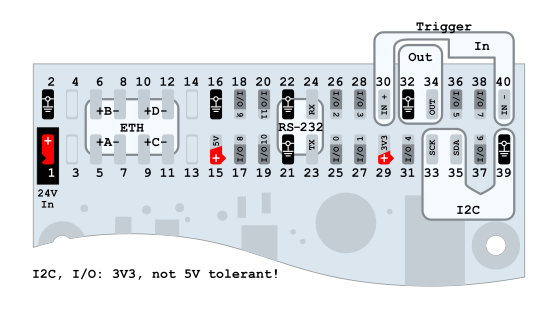
| Signal | Pin | Number | Signal |
|---|---|---|---|
| Power (24V) | 1 | 2 | GND |
| — | 3 | 4 | — |
| Eth A+ | 5 | 6 | Eth B+ |
| Eth A- | 7 | 8 | Eth B- |
| Eth C+ | 9 | 10 | Eth D+ |
| Eth C- | 11 | 12 | Eth D- |
| — | 13 | 14 | — |
| 5V out | 15 | 16 | GND |
| IO_8 | 17 | 18 | IO_9 |
| IO_10 | 19 | 20 | IO_11 |
| GND | 21 | 22 | GND |
| RS232_TX | 23 | 24 | RS232_RX |
| IO_0 | 25 | 26 | IO_2 |
| IO_1 | 27 | 28 | IO_3 |
| 3.3V out | 29 | 30 | Trig_in + |
| IO_4 | 31 | 32 | GND |
| I2C_clock | 33 | 34 | Trig_out |
| I2C_data | 35 | 36 | IO_5 |
| IO_6 | 37 | 38 | IO_7 |
| GND | 39 | 40 | Trig_in - |
2.2.2 Electrical specifications of the VCSBC DragonCam Series Power Supply interface
| Nominal Voltage | 12 – 24 V |
| Nominal Power Consumption [1] | 4.2 W |
| Minimum operational voltage (including ripple) | 9 V |
| Minimum nominal Operating voltage and corresponding current | 12 V, 350 mA [2] [3] |
| Maximum nominal Operating voltage and corresponding current | 24 V, 175 mA [2] |
| Maximum operational Voltage (including ripple) | 30 V |
| 3.3V output maximum current | 100 mA |
| 5V output maximum current | 100 mA |
Power must be connected to pin 1&2 of the ST 1 connector.
Camera power is regulated, so only an unregulated power source of 12 V to 24 V is required. The camera is, however, very sensitive to power supply interruption. Please make sure, that the voltage never exceeds the limits of < 9 V, > 30 V even for a short period of time. In case of trouble it is recommended to back up the power supply by a capacitor or a battery large enough to prevent power interruptions.
The camera may need more current for a short time at startup.
| [1] | Typical power consumption without using the onboard 3.3 V supply. |
| [2] | (1, 2) Current drawn from the 3.3 V on board signal needs to be added to these figures. |
| [3] | Power consumption may change with processing load and FPGA revision. |
2.2.3 Electrical specifications GPIOs and I2C interfaces
Note
GPIO signals are LVCMOS 3.3 V.
| IO_0 – IO_11 | Digital LVCMOS (3.3 V) programmable general purpose input / outputs |
| I2C_Clock and I2C_Data | Open collector 3.3 V I2C serial Bus Interface for additional peripherals |
| RS232_TX and RS232_RX | Native RS232 serial interface |
The following Signals have a 4k7 pull up resistor on board: - I2C_Clock - I2C_Data
Warning
The I/Os are very sensitive (also to ESD) and not
galvanically separated. Opto-isolation of the driving circuit is
therefore strongly recommended. It is also recommended to keep the cable
as short as possible!
Please note that the I/Os are not protected against over current. The I/Os are neither protected against short circuit nor reverse voltage spikes from inductive loads.
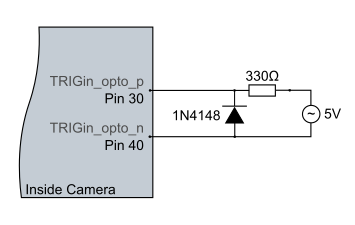
2.2.4 Electrical specifications trigger input and output
2.2.4.1 Trigger IO Specifications
The board features a dedicated fast trigger input (opto-isolated, for use as image capture trigger) and a fast trigger output (as strobe-light trigger). Since both signals are fast at a very low noise margin, it is recommended to keep the cable as short as possible. Use twisted pair or even coaxial cable for this purpose. The trigger input assures a constant image capture delay without jitter.
2.2.4.2 Circuit trigger input and output
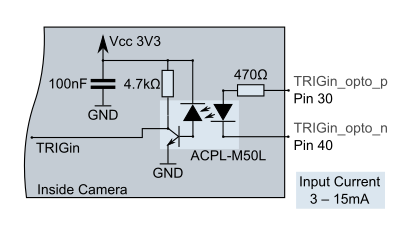
Circuit at Trigger Inputs
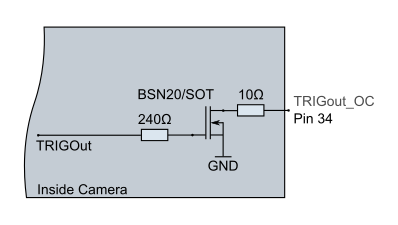
Circuit at Trigger Outputs
2.2.4.3 Example of driving circuit for the trigger input and output
Connection of Trigger Inputs
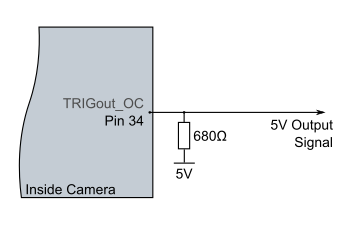
Connection of Trigger Outputs
2.3 ST 2: Ethernet Socket
| Display Socket Top View | Pin | Signal |
|---|---|---|
 |
1 | GND |
| 2 | GND | |
| 3 | ETH_A_p | |
| 4 | ETH_A_n | |
| 5 | GND | |
| 6 | GND | |
| 7 | ETH_B_p | |
| 8 | ETH_B_n | |
| 9 | GND | |
| 10 | GND | |
| 11 | ETH_C_p | |
| 12 | ETH_C_n | |
| 13 | GND | |
| 14 | GND | |
| 15 | ETH_D_p | |
| 16 | ETH_D_n | |
| 17 | GND | |
| 18 | GND | |
| 19 | ETH_LED_Link | |
| 20 | ETH_LED_Duplex |
Warning
Do not connect Ethernet on ST1 and ST2 at the same time.
Even connecting a cable while not using the link may lead to malfunction.
2.4 Realtime clock and backup battery
The board contains a realtime clock (RTC) with battery backup. The RTC is set during manufacturing to the current date and time. For backup a rechargeable lithium coin cell battery is used. This battery is charged to only about 10 percent of the nominal capacity on delivery and may be empty after a prolonged period of storage. We recommend charging the battery for at least 50 hours and setting the RTC (linux command: hwclock and date) when the board is first used (battery charges automatically when the system is powered on). The battery contains so little lithium, that it is not listed as a hazardous device for the environment and the flight export regulations. For details please refer to https://industrial.panasonic.com/ww/products/batteries/secondary-batteries/coin_rechargeable_lithium/coin-type-rechargeable-lithium-batteries-ml-series/ML621
| Battery Manufacturer | Panasonic |
|---|---|
| Battery Type | ML621 |
| Nominal Voltage | 3V |
| Nominal Capacity | 5 mAh |
| Charging Time for 100% Capacity | 100h |
| Charging Time for 80% Capacity | 50h |
| Backup Retention Time for 100% Charged Battery | 200 days |
Note
To check if the hardware clock is set appropriately, scan the output of the following linux shell command:
dmesg | grep rtc
One response line may contain the following message:
[ 0.322074] rtc-ds1374 0-0068: oscillator discontinuity flagged, time unreliable
This indicates low battery status or battery discontinuity.
To set the hardware clock it is necessary to set the software clock first:
date -s "2017-11-21 11:47:00"
Then the software clock time is transferred to the realtime clock by the following command:
hwclock -w
3 Software Interfaces
3.1 GPIOs
| GPIO Nr. | Pin Designator | Usability | Remark |
|---|---|---|---|
| 41 | IO 0 | Input/Output | — |
| 42 | IO 1 | Input/Output | — |
| 43 | IO 2 | Input/Output | — |
| 44 | IO 3 | Input/Output | — |
| 45 | IO 4 | Input/Output | — |
| 46 | IO 5 | Input/Output | — |
| 47 | IO 6 | Input/Output | — |
| 48 | IO 7 | Input/Output | — |
| 49 | IO 8 | Input/Output | — |
| 50 | IO 9 | Input/Output | — |
| 51 | IO 10 | Input/Output | — |
| 52 | IO 11 | Input/Output | — |
| 53 | TrigOut | Output | — |
| 54 | TrigIn | Input | Optically isolated |
TODO -- They can be accessed over the linux standard way via /sys/class/gpio, see https://www.kernel.org/doc/Documentation/gpio/sysfs.txt. The GPIO numbers are relative to the start number of the gpiochip labelled with '1000000.pinctrl', here: /sys/class/gpio/gpiochip0.
Note
Use the script called 'vcio.sh' to adjust the direction of the GPIO pin
first.
For example, if you use the GPIO pin 0 as output you have to specify the
output role first by the script for seeing an effect if you toggle its
GPIO-Nr. 41.
3.2 Trigger Assignment
| GPIO Nr. | Pin Designator | Assignment |
|---|---|---|
| 31(Out) | TrigOut | Trigger Output |
| 31(In ) | TrigIn | Trigger Input |
4 Accessories
4.1 Camera and Lens holder order numbers
| Order Number | Product / Service description |
|---|---|
| VK000507 | VCSBC DragonCam 0273 Smart Camera without lens holder, b/w sensor |
| VK002092 | Lens holder C Mount |
| VK000091 | Lens holder 12mm |
| EK001348 | Thermal Pad 23mm x 23mm x 2mm, 5.5 W/(m * K) |
Further models will be offered.
4.2 Further accessories available for VCSBC DragonCam Smart Cameras
| Article Description | Order Number |
|---|---|
| Power adapter for rail mounting, Input Voltage 100 – 240VAC 50/60 Hz Output Voltage DC 24V +/-5%, max. 300 mA (7.5 W) Equipped with connecting clamps for AC input and 24V output, CE cert. | VK000036 |
| Evaluation cable (for testing), 24-pin, with RJ45 connector (Ethernet), DB9 connector (RS232) and banana plugs for power supply | VK002079 |
| Thermal conductive pad 40x40x2mm | EK001122 |
5 Appendix A: Block diagram VCSBC DragonCam Series

VCSBC DragonCam Block Diagram
6 Appendix B: Drawing Circuit Board VCSBC DragonCam Series
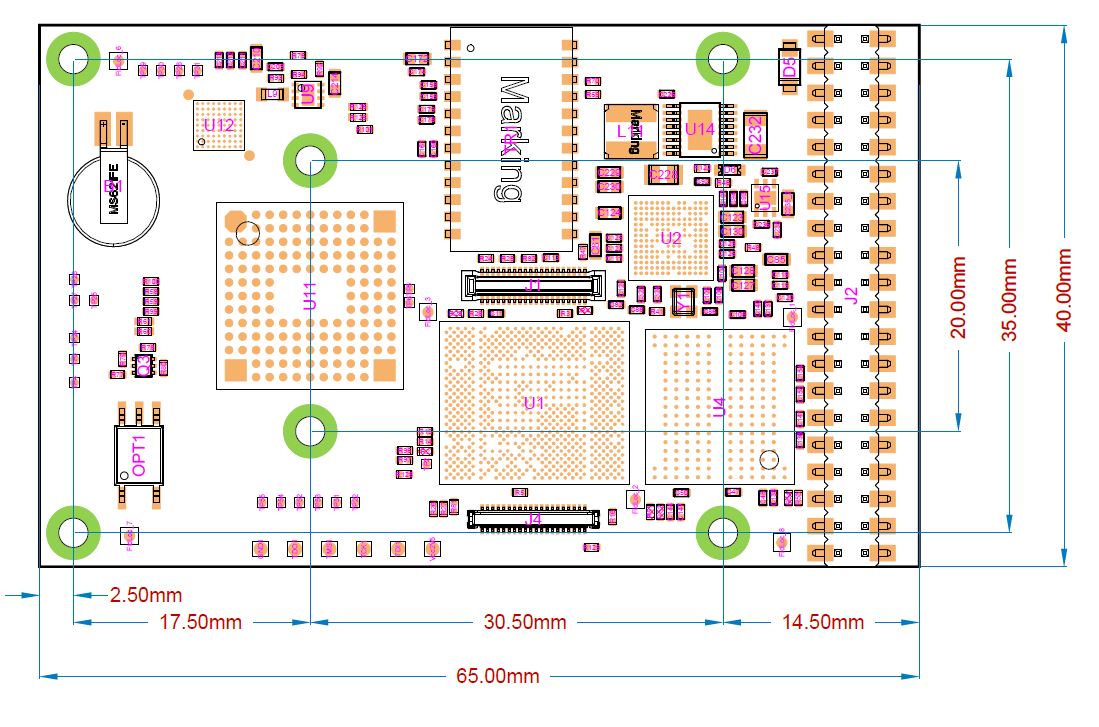
VCSBC DragonCam Dimensions